So let’s be honest—how to address an envelope sounds easy… until you’re standing with a pen in your hand and guessing everything. “Does the stamp go on the top left or right?” “Wait, is this the sender’s address or the receiver’s place?” If you’ve ever stood like that, looking at the empty envelope like you’re trying to solve a math question, trust me—you’re not alone. I’ve gone through the same confusion too.
That’s exactly why I made this guide. I’ve sent both formal and friendly letters, so I’ll show you every step, with no stress. From stamp placement to return address—we’ve got you covered with a simple, visual, and even fun guide.
Even if you’re interested in envelope writing jobs, there are opportunities for you to make a career out of beautifully addressing letters.
How to Address an Envelope: Step-by-Step Video Guide
Writing and sending a letter might feel old-school, but the envelope? It says a lot even before your message is read.
Whether you’re sending a formal invitation or just a sweet handwritten note, how you address your envelope really matters — not just for how it looks, but to make sure it actually gets to the right place.
So, let’s look at the step-by-step process together — no confusion, no guessing.
Step 1: Choose the Right Envelope Orientation
Before you begin writing:
- Use standard 8.5 x 11 letter-size paper for your documents, which fits perfectly in a standard envelope. For larger documents, you might need legal-size paper instead of letter size.
- Hold the envelope horizontally (with the long side at the bottom). Don’t turn it upright — that can confuse the postal machines.
- Make sure the flap is at the back, and you’re writing on the plain front side. These small steps are all part of understanding how to address an envelope correctly.
- A clean, flat surface helps keep your writing neat and easy to read.

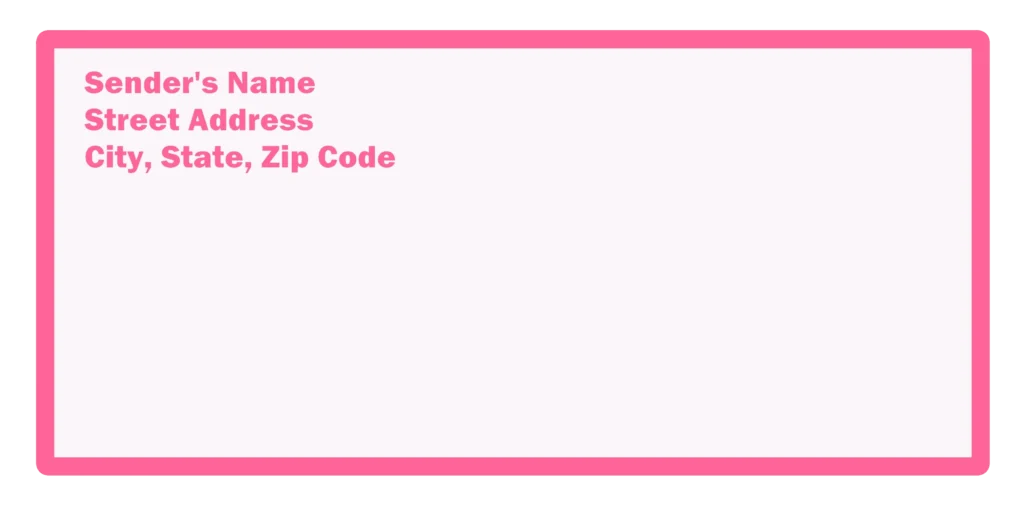
Step 2: Write the Return Address (Sender’s Info) Top Left Corner
It is an important part of learning how to write return address on envelope correctly, as it helps the postal service send it back to you.
What to include:
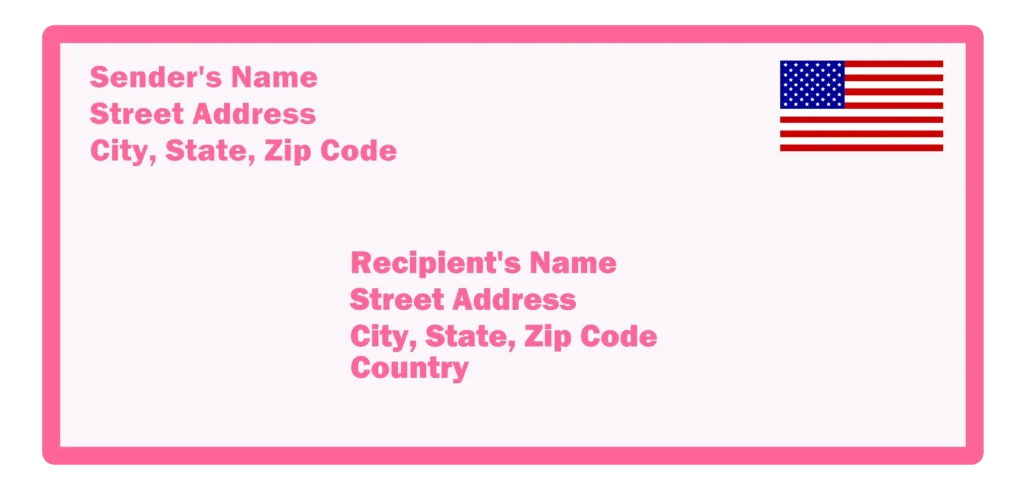
Write your address in this order, on three separate lines:
- Full Name
- Street Address
- City, State, Zip Code
- If you’re in an apartment, here’s how to write an apartment address on an envelope: add the unit or apartment number after the street.
Example: 123 Main Street, Apt 4B - If you’re using a suite or office, write it like this:
Example: 456 Elm Road, Suite 201 - City, State ZIP Code
Example: Los Angeles, CA 90001
Why it matters:
Think of the return address on envelope as a safety net. If something goes wrong — like the address is incorrect or the recipient has moved — your letter won’t be lost. It will come back to you. Including a return address on envelope is a key part of learning how to write an address on an envelope properly.
Tip:
Write clearly and use capital letters if you can. This helps avoid delivery mistakes.
It’s a small detail, but it can save you time, reduce stress, and even prevent wasted postage. It also shows that you’re careful and professional.
You can also get a return address stamp for faster and cleaner addressing.
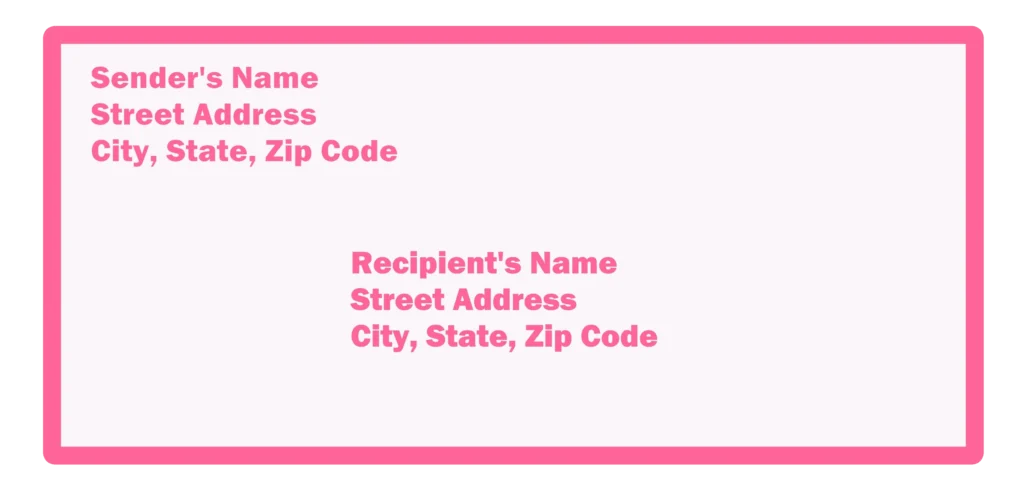
Step 3: Write the Recipient’s Address Centre of the Envelope
Wondering how to fill out an envelope? Just follow this format and you’ll be good to go.
Where it goes:
Write the recipient’s address in the center of the envelope, just a little below the halfway point. This helps postal machines and workers read and sort your mail easily, without confusion.
How to format it (line by line):
- Full Name of the Recipient
- Street Address or P.O. Box
- City, State, Zip Code
- If they live in an apartment, include the apartment number.
Example: 789 Oak Street, Apt 12C - If it’s a business address with a suite number, write it like this:
Example: 101 Pine Avenue, Suite 305 - City, State ZIP Code
Example: Houston, TX 77002
For special cases:
If you’re sending mail to someone at a business or another person’s address, use “C/O” (Care Of) before the name.
Example: C/O John Smith
If you’re sending business mail, you can also use “Attn” (Attention) to make sure it goes to the right person or department. For more information please read proper guide Attn on envelope.
Example: Attn: HR Department
Step 4: Place the Stamp Top Right Corner
The stamp is what sends your letter — you have to make sure it’s in the right spot.
For U.S. mail, use a Forever stamp or the correct postage.
For international mail, check the required postage for that country.
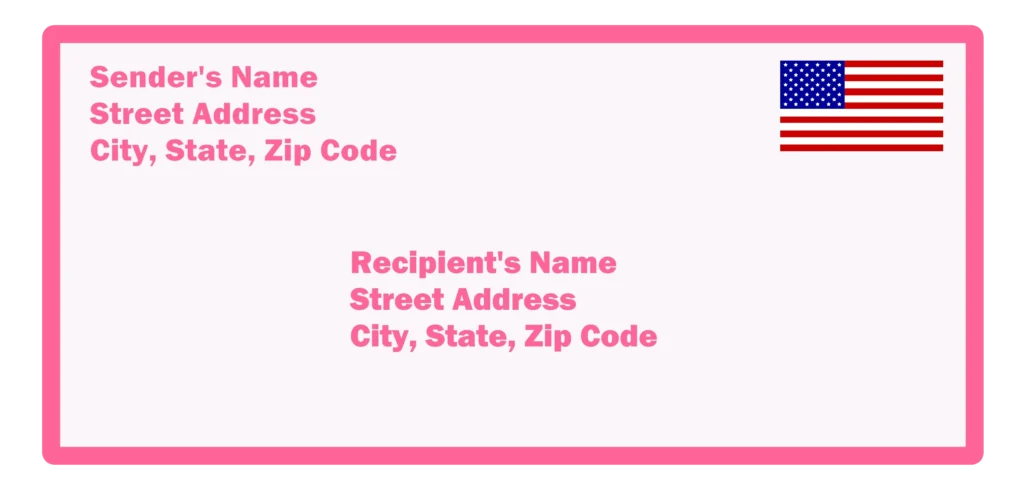
Don’t let the stamp cover any part of the address.
Addressing International Mail
When you’re sending mail to another country, the address format might be a little different.
But don’t worry — it’s easy if you follow these simple steps. For sending postcards, here’s how to write a postcard properly.
How to format it:
- Write the Country name in ALL CAPITAL LETTERS on the last line.
Example:
TORONTO, ON M4B 1B3
CANADA - Try to write the full address in English if possible. This helps international postal workers understand it better.
- Don’t add extra information like province codes or local directions unless they are part of the official address format.
Following these small steps can help your letter arrive faster and without any issues, no matter how far it’s going.
Common Mistakes to Avoid
- Don’t write too close to the edges — postal machines might get confused. These little layout details are key when learning how to address an envelope properly.
- Don’t skip the return address — if delivery fails, your letter won’t come back.
- Don’t forget to check ZIP or postal codes — even one wrong digit can cause delays.
Extra Tips for a Professional Look
- Use a black or blue pen — pencil can smudge or fade. These small details are important when learning how to address an envelope properly.
- If sending many letters, printing address labels is faster and neater.
- Keep your handwriting clear. Writing in all capital letters works best.
- Leave space between lines — don’t crowd the text.
- If you want to make your envelope extra special, consider using a wax seal stamp for a unique look.
Now that you have the layout, addressing an envelope doesn’t have to feel like a test or a tricky task anymore. If you’re feeling crafty, you can even learn how to make an envelope out of paper for a personal touch. You’ve got everything you need, and your envelope is all set to make a great impression.
Addressing Mail to Military Personnel (APO/FPO/DPO)
When sending mail to someone in the military, the address format is also quite different. There are special cases, and it’s important for you to follow the correct structure to make sure your mail reaches them.
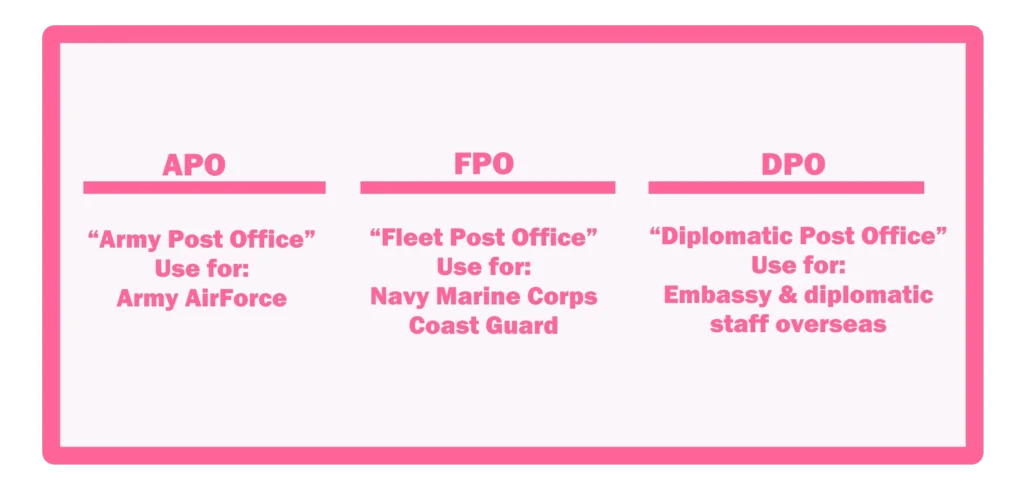
What APO, FPO, and DPO mean:
- APO – Army Post Office
- FPO – Fleet Post Office (for Navy and Marine Corps)
- DPO – Diplomatic Post Office (for U.S. Embassy staff)
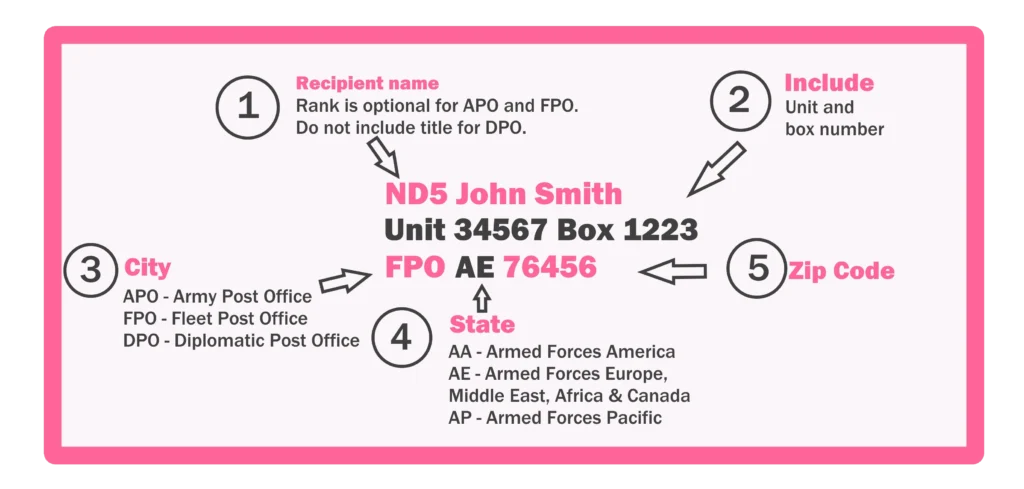
Important guidelines:
- Do not include the country name in the address.
- Use the military address structure — not a regular city or state.
- Stick to the standard format used by the U.S. Postal Service.
Special U.S. Addresses
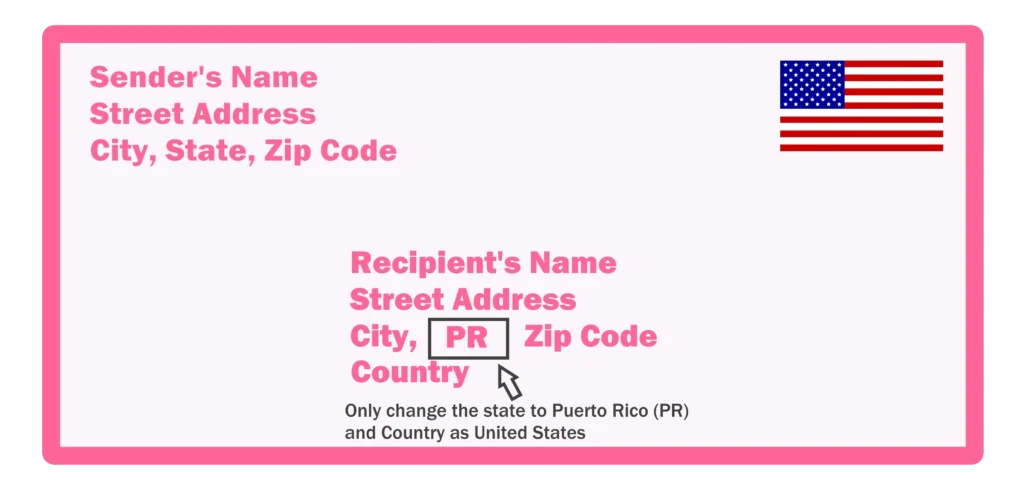
Puerto Rico
When mailing to Puerto Rico, you will use the standard U.S. address format. The only difference is that Puerto Rico is considered a U.S. territory, so it follows the same rules.
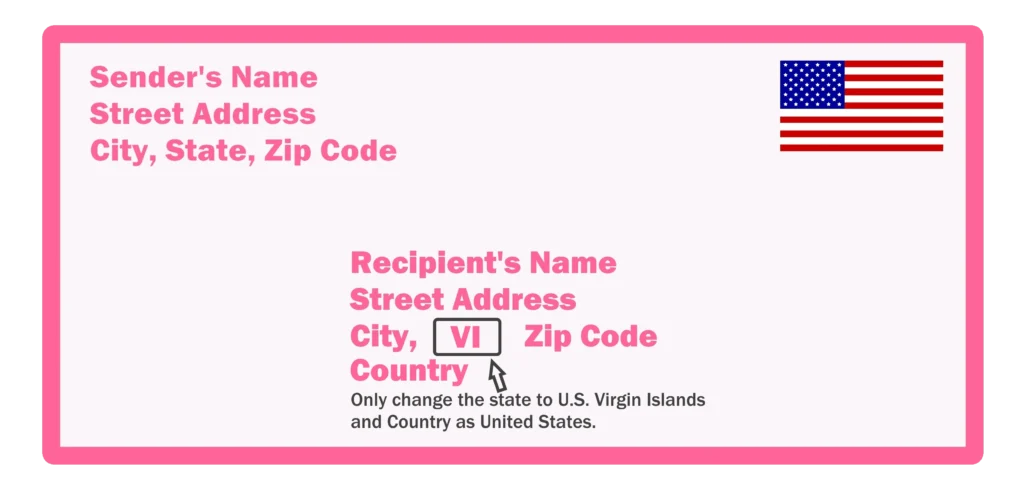
U.S. Virgin Islands
Mailing to the U.S. Virgin Islands also follows the standard U.S. address format. You have to be sure to include the correct territory name and ZIP code.
Important Note:
Even though these locations are outside the mainland, they’re not considered international. So, you should keep using the regular U.S. mailing format and follow any local nuances.
Personal Envelope vs. Business Envelope
| Use the recipient’s full name only. | Add the company name on a separate line. |
| No need for job titles or departments. | You can include job title or department if needed. |
| More casual — often friends or family. | More formal — sent to offices or professionals. |
| Example: | Example: |
| Emily Parker | Attn: HR Department TechCorp Solutions |
Why it matters:
Using the correct format helps your mail reach the right person without delays. Business addresses can be busy places — clear labeling ensures your letter lands where it should.
Handwritten Envelope vs. Printed Labels Envelopes
| Great for one-time or personal mail. | Best for bulk or formal mailings. . |
| Just make sure your writing is neat. | Clean, consistent, and easy to scan. |
| Adds a personal touch. | Looks professional and saves time. |
| Example: | Example: |
| handwritten neatly with a pen. | typed and printed with clear font. |
Quick Tip:
Whether you write or print, make sure the address is easy to read and well-aligned. A clear label shows attention to detail — and helps avoid delivery mistakes.
How to Find ZIP+4 Codes
Just to make sure your mail reaches the right place, you can also use the ZIP+4 code. This is a more specific version of the regular ZIP code and helps pinpoint exactly where your mail should go, which is crucial when learning how to address an envelope correctly.
What ZIP+4 means:
It’s a ZIP code with four extra digits that narrow down the delivery location. It could refer to a specific building, apartment, or even a department in a large company.
Why it matters:
Using the correct ZIP+4 code speeds up delivery and reduces the chances of your mail getting lost.
To find the right ZIP+4 code, you can use the USPS ZIP Code Lookup tool online. Just enter the address, and it will show you the full ZIP+4 code.
Stamps and Mailing Costs
For Domestic Mail:
When you’re sending mail within the U.S., the easiest way is to use Forever Stamps. These stamps are used for standard letters, no matter how postal rates change. For larger items like flats or parcels, you’ll need different stamps based on the weight and size.
While learning how to address an envelope correctly is important, it’s also crucial to figure out exactly ‘how much postage do I need’. You can use the USPS online tools to calculate it.
Using the correct postage helps make sure your letter or package reaches its destination without delays.
For International Mail:
When you’re sending mail to another country, you can use the Global Forever Stamp. This stamp works for international letters, no matter where they go. Check the cost of first-class stamp for standard letters and packages.
The price will depend on the weight and destination of the item. The farther it travels and the heavier it is, the higher the cost will be.
Why Envelope Etiquette Still Matters
In today’s digital world, how to address an envelope and present it still matters. When it looks clean and neat, people will notice. A well-presented envelope shows that you care about the details, which gives a positive impression.
When you send formal or business mail, paying attention to the envelope’s appearance also shows professionalism. It signals that you are serious about the message inside.
Whether you’re sending a thank-you note, important documents, or a casual letter, making your envelope look neat and clean is a small gesture that shows your respect for the person receiving it.
The Emotional Value of Real Envelope in a Digital World
Even in today’s world with instant messages and emails, sending and receiving real mail feels really special. The unique connection you feel when you see handwritten mail in your mailbox is very wholesome. Unlike quick texts or WhatsApp messages, real mail takes time, care, thought, effort, and a personal touch. How to address an envelope properly is just one way that shows someone has taken the time to make their message personal. When someone takes the time to send you a handwritten letter, it shows they value you.
Even with all the convenience of digital communication, real mail is still meaningful. It’s a reminder that sometimes, the best connections come from slowing down and giving something of yourself, just like people did before emails and texts became the norm.
Conclusion:
Now that you’ve learned how to address an envelope, you’re ready to take on the task with confidence. It may seem small, but the envelope plays an important role in making sure your message gets to the right place. From understanding the right address format to choosing the correct postage, you now have all the tools you need.
So now you know how to write a letter while making sure it’s properly addressed, so why not give it a try? Write a letter today, even if it’s just for fun or to practice. You’ll feel more confident every time you do, and you’ll be surprised by how much you’ve learned!
Frequently Asked Questions ( FAQs)
Attn on Envelope: What It Means and How to Format It Right
How Many Stamps Do I Need And Postage Stamps Cost

How to Make an Envelope